Tuesday, February 4, 2014

How to Reset a WiFi Router


Your WiFi router broadcasts a wireless signal that connects your WiFi enabled computer to the wireless network, as well as provides access to the Internet. If you are having problems connecting to the Internet through your wireless connection, you may need to reset your WiFi router. Resetting your router will usually solve the problem.


Instructions

Things You'll Need
1. Pin
2. Paperclip


By Pressing the Reset Button


  1. Find the reset button. It is usually located on the back of the router and it should be clearly labeled, "Reset."
  2. Press the reset button with a pin, paperclip or pointy object. The reset button on some routers are recessed, so you will have to insert the object inside the hole to press the button.
  3. Hold down the reset button for 10 to 30 seconds. After you release the button, the lights on your wireless router will blink, and then resume their normal operation. The settings will be restored to the factory default.


Through the Web Browser Interface


  1. Open your Web browser and type in the IP address of your wireless router. A common default IP address for many routers is, "192.168.1.1." Alternatively, you can find your router's default address on a sticker on the bottom of the device, or in the user manual. Your router's log-in page will appear.
  2. Type in your username and password. If you have never changed the log-in information, you can find the default log-in in your wireless router's user manual. The router's main admin page will be displayed.
  3. Click the "Administration" or "Advanced" tab followed by "Reset to Factory Defaults." Click "Yes" and then "Save" to reset the router.

Connect Wifi Ad Hoc Network Connection between 2 Laptops Without Router

In the world of wifi connectivity of internet connection, you don’t want to have your laptop or pc for lacking these features of sharing your social activities on various social media anytime with your peer groups, close friends, relatives or even your office members.

You may have some more methods to establish a connection via wifi hotspot, bluetooth and usb tether from any mobile device source. For in case those not having access to a wifi network connection at a place, and want to have a connection from a different laptop, must follow the following steps.

Windows 7 and Vista come with a build-in feature to connect a quick wifi ad hoc network connection between 2 laptops. It means that you can directly connect your laptop network connection with another one directly without any router.

Steps to Connect WiFi Ad Hoc Network connection with another laptop directly:

1. Open the Windows Control Panel, and click “Network and Internet”.

2. In the window of Network and Internet, click on “Network and Sharing Center”.

3. Click “Set up a New Connection or Network”.

4. The “Set Up a Connection or Network” dialog box appears. From the list, select “Set Up a 
    Wireless Ad Hoc (Computer-To-Computer) Network” option and click “Next”.


5. Click “Next” again and will ask you to type a Network Name and select the Security        Settings.

6. Have a good password. The default security type is WPA2-Personal. The security key is  case-sensitive and 8-63 alphanumeric characters. You can optionally select the check boxes  to hide characters for your security key and save this network for future use.


7. As this is done, click “Next” and ad hoc network will become ready to use. A confirmation page will show you your ad hoc network settings.

8. Now in the Network and Sharing Center you can choose what to share.

9. In order to share an Internet Web connection, click “View Status” next to the connection that you want to share. Now click on the Properties button which you’ll find under Activity. Click on the Sharing tab and tick the checkbox where it says “Allow other Network Computers to connect through this computer’s internet connection”. Under Home Networking Connection select “Wireless Network Connection” and click “OK”.

How to access your IP camera from the Internet


True geeks come usually with 3 major faults:  they don't do backups, they don't quarantine new fishes, and, they never read the manual!
What follows is actually quite well explained in the IP camera manuals, but remains the most frequently asked question:

"How do I access my IP camera from the Web ?" 

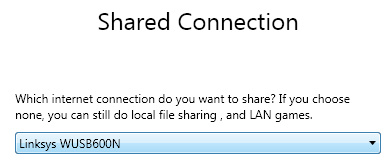
Taking from the point where your IP camera is accessible from inside your home network, the very next thing you want is to access it from outside as well, using a PC or a phone, on holiday or at your workplace.

This short guide assumes that your camera connects to a router, the most common scenario, so the ADSL and DDNS settings of the camera itself are not used here. All the job will be done on the router. If you do dial-up from the camera, you can still quite easily transpose the instructions below to your case as soon as you get the idea.

1. Dynamic DNS setup
While not vital, using (Dynamic DNS Service) http://en.wikipedia.org/wiki/Dynamic_DNS  will make your life easier. Without it, you need to know what external IP address your ISP assigned to you and use it as part of the url to access your network from the outside (http://10.11.12.13). This IP address is likely leased for a limited time and subject to change, so you'd need to keep track of it.

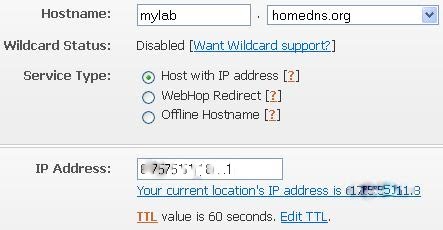
Upon registration, the dynamic DNS service will give you a list of domains to choose from, and will map it to your external IP address. 

The router will interact with the dynamic DNS service to update it with any IP address change. Most routers have a dedicated section where to enter your Dynamic DNS account details. 

First thing to do, is to retrieve the section dedicated to DDNS setup in your router configuration and check what choice of DNS service providers it available (PortForward.com has screenshots from many routers to help you locating the right setup page for your model.), this varies from manufacturers, but almost all will support the most popular one: dyndns.com.  Pick one available and then go to their corresponding web site to create an account.


In this example, we will choose to map our external IP address with http://mylab.homedns.org


You will be told if the name+domain name combination is already taken and will have to choose another one.

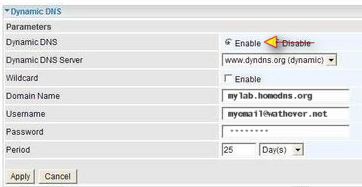
Once this is done, you just need to enter your login and domain name into your router:


Your router will now keep dyndns automatically updated with any ip address change.

2. Port forwarding


Now that  the url http://mylab.homedns.org leads to your external address, you still need to tell the router where this incoming traffic will be redirected inside your lan.
In this example, suppose you have the following devices in service:
IPCam1 on 192.168.1.100 using port 80
IPCam2 on 192.168.1.101 using port 80
  NAS  on 192.168.1.102 using port 80

The port forwarding will just tell to which of them the incoming traffic will be forwarded.
Here, if we want http://mylab.homedns.org to lead to the internal http://192.168.1.100, we need to set this up in the router as follow:


The port forwarding section is generally located in the Virtual Server category of the router. 

Again, http://portforward.com/ will help you find the right section on any router model. 

You can setup several port forwarding entries so the other devices are accessible as well, but the incoming port needs to be different for each of them:


- incoming http://mylab.homeftp.org:81 goes to IPCam2 internal http://192.168.1.101(:80)


- incoming http://mylab.homeftp.org:82 goes to NAS internal http://192.168.1.102(:80)


Please note: For the port forwarding to work consistently, you must assign fixed internal IP addresses for your devices in the router's DHCP table. Make sure also that your router firewall doesn't block the incoming traffic on ports used.

3. Multi-device setup

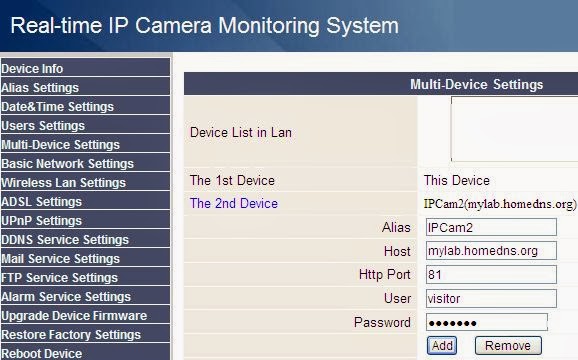
IP cameras like Foscam offer the convenience to access up to 9 ip cameras through the interface of one.

If you use this feature, you probably entered the internal ip addresses in the Multi-Device section of the ActiveX configuration interface.

So when connecting from the Internet, you will realize that only the master camera is accessible and the others can't be viewed, and show a steady yellow dot in the device status section.

To sort this out, you need to go back to the multi-device setup and replace the internal IP addresses by their respective DNS paths and ports.


For your intranet usage, if you don't like the idea of that traffic out-and-in, you still can configure the multi-device section of your other camera with the internal ip addresses and use this one at home.

Monday, February 3, 2014

Remote Desktop Software - UltraVNC

UltraVNC is an easy to use computer program that can display a screen of another computer (via internet or network) on your screen. UltraVNC will allow users you to use their mouse and keyboard to control the other PC remotely. It means that you can work on a remote computer, as if you were sitting in front of it, right from your current location.

If you provide computer support, you can easy access your customer's computers from anywhere in the world and resolve helpdesk issues remotely! Your customers don't have to pre-install software or execute complex procedures to get remote helpdesk support. 

UltraVNC software allows you to remotely control a computer over any TCP/IP connection. UltraVNC emulates the destination computer to make it look as if you were in front of it.

Download Link:
UltraVNC

Features:


  • Auto configuration and Quick Options for easy connections.
  • Viewer Toolbar for a quick access to the main functions and greatly improved ergonomy.
  • High Speed. On W2000 and XP, UltraVNC can use an additional and optional Video Hook Driver (aka Mirror Driver) that dramatically improves performances and reduces CPU activity over LAN connections. So when the bandwidth is good - typically over a LAN - UltraVNC lets you work on a remote computer with an incredible 'real-time' feeling (hundreds of screen updates per second), just as if you were sitting in front of it. AWinVNC server under Win9x uses the standard hookdll in combination with ddi hooking to improve the updates handling. Ultr@VNC also features an ultra fast Fullscreen Polling mode without any additional driver. Whatever the connection speed, UltraVNC brings you optimal comfort. Note that this driver is distributed separately from UltraVNC.
  • Embedded File Transfer with intuitive Graphical User Interface allowing for easy file copy between local and remote computers. It uses the current VNC connection and files are compressed during their transfer. File transfers can be asynchronous so screen updates can continue while a file is being transferred in background. The delta transfer mode allows to resume interrupted transfers.
  • MS Logon/NT security support. You can manage server access using MS Users, Domains and Groups. It also includes a logging feature where all actions are written to a log file.
  • Bandwidth Saving Strategies that provide optimal responsiveness over slowc onnections: Server Screen Scaling, Cache Management , Local Cursor handling,reduced colors modes (256, 64, 8, Grey scales).
  • Advanced Java Viewer featuring FileTransfer, MSLogon and reduced color modes.
  • Data Stream Modification Plugin System allowing any kind of operation on the data exchanged between client and server, from an external DLL (independent, not linked and not distributed with UltraVNC): additional rights checking, communication timing, data recording/persistence, encryption... it's up to the DLL developer.
  • Optional "always-on-top" Viewer Status Window dynamically displaying connection informations.
  • Various View Modes including Full-Screen, Scaled and Windowed. Full-Screen mode lets you see the remote screen on the entire screen of your display. Scaled Viewer mode lets you see the scaled remote screen in a window with a user-defined size. Scaled Server mode generates less network traffic from server side and use a pixel blending algorithm to optimize the display. Fuzzy Mode combines Server and Viewer scaling to provide reasonable visual comfort and speed even over very slow connections. The Autoscaling mode scales the view so it fits the viewer screen.
  • Dynamic Single Window/Full Desktop view switching, from viewer side.
  • Server's Desktop resolution switching without disconnection.
  • Dynamic Mouse and Keyboard locking on remote server, from viewer side.
  • Server Screen Blanking, from viewer side.
  • Embedded Client/Server Text Chat.
  • Possibility to send Ctrl-Alt-Del to the remote server(when WinVNC is run as a service), or any other special key.
  • Support for 32/24/16/8 bits colors. Both UltraVNC Viewer and Server are compatible with RealVNC, TightVNC, eSVNC,PalmVNC2 (with server scaling feature)...UltraVNC server can work as a Service under all supported operating systems, allowing remote user Logon/Logoff as well as Remote Shutdown.
  • Connectivity: Standard Viewer and HTTP JavaViewer connections over TCP/IP,as well as XDMCP direct X11 connection.

Sunday, February 2, 2014

IP Webcam - Turns Your Android Phone into a Wireless Camera

IP Webcam turns your Android Phone into a network camera by streaming the phone's camera over its Wi-Fi connection for remote viewing.

Install the app, tweak the settings (login/pass, resolution, image quality), and then simply load up the URL it gives you in a web browser (I used Chrome for testing) or a client that accepts streaming video (I used VLC).

Although the individual stills are blurry, the overall video itself was decent enough quality. While it won't replace a dedicated HD web cam or security camera it does add solid remote-viewing capabilities to your Android phone and requires minimal setup. IP Webcam is free and requires Android OS 2.2+. You can download it by searching for "IP Webcam" in the Android Marketplace.  iPhone users will want to check out iWebCamera for similar phone-to-desktop streaming. 


Turn your laptop into a Wi-Fi hotspot -Connectify Pro 5.0.1 Full Crack Free Download

Connectify Hotspot turns your PC into a Wi-Fi hotspot, letting other computers, smartphones and tablets share your connection.  Connectify Hotspot is an easy to use software router for your Windows computer that lets you transform your laptop into a Wi-Fi hotspot so you can share a single Internet connection - such as wired ethernet, a 3G or 4G card or adapter, even another Wi-Fi network - with your friends, co-workers, and mobile devices. With Connectify Hotspot PRO, you can turn your Windows computer into a real Wi-Fi hotspot that shares that single 3G/4G connection with any other Wi-Fi enabled devices. You'll maximize the value of your 3G/4G card and get all your peripherals online at the same time!


Features:


  • Share access point
  • Share your internet connection with anyone!
  • Display connected computers/devices
  • Firewall controls
  • Share 3G/4G connections
  • Custom Hotspot name(SSID)
  • WiFi repeater functionality
  • "Fling" Drag and drop file transfers
  • Auto internet selection
  • Unlimited hotspot uptime
  • No ads or banners 
  • How to Install and crack it?


Download and install Connectify. 

You can get it from:
or
or

How to Crack Connectify Pro version?

1. Disable your internet or WiFi connection

2. Add the following entry to your HOSTS file without the quotes "127.0.0.1 updates.connectify.me"   
Take a look at this following link for that how to modify your hosts file?.

3. Install Connectify Dispatch

4. Inside the win RAR archive you can see registering details such as (Email address and Serial Number) in a notepad text file.

5. Go into "%ProgramFiles%\Connectify\plugins\" and remove the 'dispatch' dirlowing entry to your HOSTS file without the quotes "127.0.0.1 updates.


Connectify Setup Guide


Once installed, open Connectify by clicking on the little icon as pictured below.


Upon the first start, Connectify presents you with a very easy-to-use wizard. Click “Next”, and select the Wi-Fi device you want to use to share your Internet connection. If you only have one adapter, this screen doesn’t show up, so jump to step three!

Note: Some adapters might not allow both connecting to a Wi-Fi network (at home, work, or in public) and sharing the Internet connection at the same time. If that’s the case, you need a secondary Wi-Fi USB adapter.


Hit “Next”, and enter the name of the Wi-Fi hotspot that you want to create. Below is an example.


Then, select the “Hotspot Mode”. If your Wi-Fi connection is capable of sharing the same Wi-Fi for both the Internet connection and the Connectify hotspot feature, make sure that “Access Point, WPA2-PSK” is selected. If you want to set another security level (for compatibility reasons), then the Internet connection needs to come in from another source like a 3G card, a cable modem or a direct LAN connection.


Enter a password to protect your personal Wi-Fi hotspot, and hit “Next” again. The following step of the wizard is crucial; Connectify will now ask you which Internet connection you want to share. For example, let’s use the same Wi-Fi adapter.

That’s it! Click “Finish”, and in a few short moments, you will be able to connect all of your Wi-Fi-enabled devices to your laptop’s own hotspot.

Note: If other devices cannot connect to your hotspot, it is possible that they don’t support the security standard “Access Point, WPA2-PSK”. Although another standard might be more compatible with older devices, we don’t recommend setting any other security level.

It’s that easy! We use Connectify all of the time when we’re on the road. It is one of the top tools for PC users that travel a lot and don’t want to be bothered with getting individual connections for all of their devices.

How to Get Started with Skype full

Once you have installed Skype, a screen pops up to help you get started exploring Skype, finding friends, and testing your sound. From the pop-up screen, you can do all of the following.

1. Check that your sound works.


This option allows you to test your speakers and your microphone. If you have a Web cam, you can also check your video.


How do I adjust the sound settings on your computer and in Skype for Windows XP and Windows 7?


Making Video Calls with Skype.


Automatically diagnose and fix Skype audio and webcam issues with Fix it.


What it fixes...

  • One or more audio services, such as the Windows Audio service, are not running. In this situation, you receive an “audio service is not running” error message.
  • Your sound and audio devices are disabled in Windows.
  • The audio is muted on your device.
  • Your computer or laptop speaker volume is very low because the volume of your audio device is set too low.
  • Your installed audio device is not set as the default audio and playback device.
  • Your audio device is not plugged in.
  • You receive a “There might be a problem with your audio device” error message.
  • Because of HDMI audio problems, you hear no sound through an HDMI connection.
  • Windows Update is not configured to download and install updated audio drivers for your sound card.
  • Skype does not detect a camera.
  • Video crashes when you use a webcam.

2. See what you can do with Skype.
This option gives you information about both free and fee-based features, as well as Skype’s security and privacy terms.

3. Find friends and import contacts.
This option shows you how to check whether your e-mail contacts are on Skype and how to look up people on Skype in general.

1. Double-click your Skype icon on the desktop or choose Start→(All) Programs→Skype to launch Skype.


If for some reason the main Skype window is obscured, repeatedly press Alt+Tab on the PC or Option+Tab on the Mac to cycle through all open applications until you navigate to the Skype application.

2. Enter echo123 in the text entry box that contains the text “Search Contacts, Groups, and Conversation Topics.”


Normally, this box is where you would enter the Skype Name or number of the person you want to call, but entering echo123 connects you to the Skype Call Testing Service.

3. Click the green call icon that appears in the middle of the screen.

The green call button has a handset on it and is the one you click to place a call. Clicking the green button connects you to the Skype Call Testing Service. When you’re connected, you hear a personable voice calmly guiding you through an audio test.


Compare your Windows Sound settings with your Skype Sound settings. To locate your Skype Sound settings, choose Tools→Options→Audio settings. To locate your Windows Sound settings, choose Start→Control Panel→Sounds and Audio Devices. (This path may differ on some computers with different operating systems and configuration setups, but your aim is to locate the Sounds and Audio Devices control panel.) Make sure that the sound devices match.

If no one can hear you, you may have the wrong device selected in your Skype sound settings. If more than one device is listed, make sure that the device selected is the microphone you are using.
If you can't hear anything, you may have the wrong audio out device selected in your Skype sound settings. If more than one device is listed, make sure that the device selected matches the headset or speakers you are using.